
I've seen a lot of people asking about how to build beetle enclosures as of late. Recently I added another colony so I thought I'd share. Ive made dozens of deferent enclosures and this is by far the best method I'v found. It can support massive colonies can be scaled up or down depending on your freezer, it is also inexpensive to build and operate. feel free to message me with any questions!
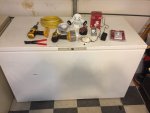
Step 1:
you'll need all the supplies.
-Chest freezer broken or working make sure it is metal inside.
-outdoor spotlight kit
-juntion box
-wire
- Metal ducttape
-thermostat make sure it is 120 volt NOT 12 volt
-duct
-Metal screendoor screen
-computer fan
-tools, wire cutters, drill, saw and so on.
Step 2:
Start by covering any holes in the freezer with metal duct tape, overlap it well. If you use normal tape the beetles will chew out.
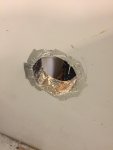
Step 3:
Next make some holes. I cut my first hole on the right side of the freezer about half way up from the bottom. You can use a hole saw, hacksaw, jigsaw or what ever you are comfortable with. Chances are you will cut through a cooling line, if it was a working freezer this is how you get blasted in the face with coolant, so be ready and maybe do it outside. Cover all the edges of the holes you make with metal tape and overlap well.
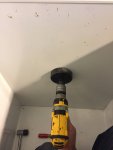
Step 4:
next screen in the holes with metal screen. I overlap the screen two or three times, make sure its tight, all you want getting in is air not bugs. Next cut a hole on the top left of the lid and tape it up like before. The hole size should match up to your fan size. Add screen on the inside and fit your fan on the outside. Unfortunately I didnt get a good photo of the fan installed. But its just a standard 4" computer fan, they are 12 volt and pretty cheap. Add a vent hose to the fan on the outside of the freezer.
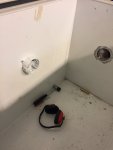
Step 5:
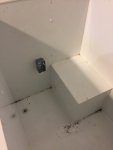
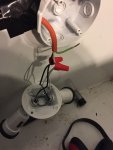
Next add the juction box for the outdoor spotlight kit, halfway up from the bottom and in the middle of the freezer next add the other juction box on the left side of the freezer half way up from the bottom. Drill a hole out the back right through the freezer. This is where your power will come in to the thermostat
Step 6:
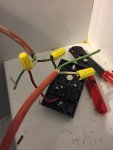
Next run in your power through the hole in the back of the juction box you just made. I used an old extention cord. You can use what you have just make sure its a heavy gauge. Wire it up just like a lightswitch and follow the instructions on the thermostat. The Black wire goes to the lights the white wire is inturupted by the thermostat. The green is ground, it isnt done yet but wire green to green and ground it in the spotlight juction box. Next wire the spotlights according to the instructions and ground the green one. wire on your plug to the end that comes out of the freezer. If you used an extension cord just keep it as is.
Step 7:
next plug it in and give it a test. I didn't have my ceramic heat bulbs yet so I just used light bulbs. If its wired up right the bulbs should come on when you turn up the temp and off when you turn it down.
Step 8:
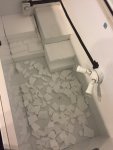
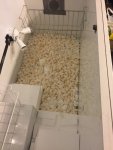
Tape up the wires and any oter holes and add the Styrofoam. The beetles love this stuff. Next I add a thick layer of packing peanuts they love this stuff too. last add a few inches of beading, I use critter care paper bedding, they seem to like it. Add your heat bulbs let it heat up and adjust the thermostat should be 70 to 80 degrees on the bedding where they live. plug in your computer fan (in the winter my fans come on for 15 minutes every hour, in the summer they run 24/7) add the beetles and get them to work. If your freezer came with a basket like the one in the photo keep it and mount it right in front of the air hole you made. Once they are done with a skull put it in the basket for a day or two, the beetles dont like the airflow and will jump off the skull and rejoin the colony on their own. A fully established colony in a freezer this size can clean a deer skull a day. If you have any questions feel free to shoot me a message.
Step 1:
you'll need all the supplies.
-Chest freezer broken or working make sure it is metal inside.
-outdoor spotlight kit
-juntion box
-wire
- Metal ducttape
-thermostat make sure it is 120 volt NOT 12 volt
-duct
-Metal screendoor screen
-computer fan
-tools, wire cutters, drill, saw and so on.
Step 2:
Start by covering any holes in the freezer with metal duct tape, overlap it well. If you use normal tape the beetles will chew out.
Step 3:
Next make some holes. I cut my first hole on the right side of the freezer about half way up from the bottom. You can use a hole saw, hacksaw, jigsaw or what ever you are comfortable with. Chances are you will cut through a cooling line, if it was a working freezer this is how you get blasted in the face with coolant, so be ready and maybe do it outside. Cover all the edges of the holes you make with metal tape and overlap well.
Step 4:
next screen in the holes with metal screen. I overlap the screen two or three times, make sure its tight, all you want getting in is air not bugs. Next cut a hole on the top left of the lid and tape it up like before. The hole size should match up to your fan size. Add screen on the inside and fit your fan on the outside. Unfortunately I didnt get a good photo of the fan installed. But its just a standard 4" computer fan, they are 12 volt and pretty cheap. Add a vent hose to the fan on the outside of the freezer.
Step 5:
Next add the juction box for the outdoor spotlight kit, halfway up from the bottom and in the middle of the freezer next add the other juction box on the left side of the freezer half way up from the bottom. Drill a hole out the back right through the freezer. This is where your power will come in to the thermostat
Step 6:
Next run in your power through the hole in the back of the juction box you just made. I used an old extention cord. You can use what you have just make sure its a heavy gauge. Wire it up just like a lightswitch and follow the instructions on the thermostat. The Black wire goes to the lights the white wire is inturupted by the thermostat. The green is ground, it isnt done yet but wire green to green and ground it in the spotlight juction box. Next wire the spotlights according to the instructions and ground the green one. wire on your plug to the end that comes out of the freezer. If you used an extension cord just keep it as is.
Step 7:
next plug it in and give it a test. I didn't have my ceramic heat bulbs yet so I just used light bulbs. If its wired up right the bulbs should come on when you turn up the temp and off when you turn it down.
Step 8:
Tape up the wires and any oter holes and add the Styrofoam. The beetles love this stuff. Next I add a thick layer of packing peanuts they love this stuff too. last add a few inches of beading, I use critter care paper bedding, they seem to like it. Add your heat bulbs let it heat up and adjust the thermostat should be 70 to 80 degrees on the bedding where they live. plug in your computer fan (in the winter my fans come on for 15 minutes every hour, in the summer they run 24/7) add the beetles and get them to work. If your freezer came with a basket like the one in the photo keep it and mount it right in front of the air hole you made. Once they are done with a skull put it in the basket for a day or two, the beetles dont like the airflow and will jump off the skull and rejoin the colony on their own. A fully established colony in a freezer this size can clean a deer skull a day. If you have any questions feel free to shoot me a message.
Attachments
-
 IMG_4176.JPG775.8 KB · Views: 2
 -
 IMG_4177.JPG804.9 KB · Views: 1
 -
 IMG_4179.JPG786.8 KB · Views: 3
 -
 IMG_4180.JPG837 KB · Views: 2
 -
 IMG_4181.JPG876.7 KB · Views: 2
 -
 IMG_4184.JPG909.7 KB · Views: 1
 -
 IMG_4185.JPG968.5 KB · Views: 2
 -
 IMG_4194.JPG767.6 KB · Views: 1
 -
 IMG_4195.JPG817.4 KB · Views: 3